
Here is the FIRST recipe using the homemade baking mix that I posted the other day!
Homemade Biscuits!
It may be obvious to a few of you but it wasn’t to me until I was mixing up the ingredients for the biscuits one day and I was like “Hey these are the same ingredients I used for my baking mix recipe!”
I know, I know, sometimes it takes me a minute or two. Well, maybe even ten:)
Anywho…these biscuits are quick to make because you already have the base of the mix done. You will just need to add a little bit of milk and give it a gentle stir.


Here’s a secret that I just learned a short time ago. Flour a clean (obviously) towel to roll out your dough and IT WILL NOT STICK! Is that insanely awesome or what? If you’re like me, you hate to roll out your homemade biscuits so you just pat the dough a little. Yes, I take short cuts.


Cut out the desired size biscuits, place them on an ungreased baking sheet, using your thumb make a small indent in the middle of each biscuit (this helps them to cook evenly) and brush with a little bit of milk (this makes them brown nicely).


See?

Ain’t they purty? They tasted good too:)
Note: You can stop before you brush the tops with milk and freeze them. After they are frozen place them in a freezer bag. Then when you are ready for some already made homemade biscuits you can pull the desired amount out of the freezer, brush with a little milk and cook for about 18 minutes @ 425 degrees.

Ingredients
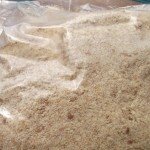
- 2 cups homemade baking mix
- ¾ cup milk, plus more for brushing tops of biscuits
- flour, for dusting towel and biscuits
Instructions
- Measure baking mix into a bowl.
- Stir in milk until just combined. The dough shouldn’t be too wet or too dry but a little sticky.
- Dust a towel with a little bit of flour.
- Pour dough onto floured towel and sprinkle the top of dough with a little more flour.
- Pat dough out to desired thickness.
- Cut dough using a floured biscuit cutter or the mouth of a floured small glass jar.
- Gently push uncut dough together and continue cutting biscuits until all dough has been used.
- Place biscuits onto an ungreased baking sheet.
- Using your thumb make a slight imprint in the middle of each biscuit.
- Lightly brush tops of biscuits with milk.
- Bake @ 425° for 12 minutes if using a dark non-stick pan or until lightly browned on top. If using a lighter pan you made need to add a couple more minutes to cooking time.
Notes
You can stop before you brush the tops with milk and freeze the biscuits. After they are frozen place them in a freezer bag. Then when you are ready for some already made homemade biscuits you can pull the desired amount out of the freezer, brush with a little milk and cook from frozen for about 18-20 minutes @ 425 degrees.
This post maybe linked up at Weekend Potluck, Teach Me Tuesday and these other awesome linky parties!


You make biscuit making sound so easy. I think I work my dough too much and I never heard of poking the center like that! Kenny says I have to do that all the time now because it makes perfect sense to him, my assistant cook, ha ha!
Still having a little difficulty with connection, but it is better……..
I’m going to try your way for this and if it don’t turn out, I’ll come to your house for biscuits and you can come to mine for cornbread……….Thanks Adrian
LOL! That sounds like a plan:)
Hey girlie…you do make it look easy. You know what happens when you teach me new stuff right? LOL J/K
I love your “baking mix” and will start using it. And I’m definitely trying out the biscuits…love the towel trick!!
Pinning it
Have a good one!
This looks so easy and delicious! I miss having homemade biscuits so I’m definitely going to need to try these out. Thanks for sharing! Pinning
Yep, homemade is the BEST made! Thanks for the pin:)
Oh, I love a nice easy recipe and this looks great. I didn’t know about the thumb trick either!
Thanks for sharing at Marvelous Monday on Smart Party Planning
Thanks Catherine for all your lovely comments!
YUM! Now I am craving fresh baked biscuits for lunchtime… do you deliver?? Thanks for linking up at Snickerdoodle Sunday- hope you’ll come back and party with us again!
Sarah (Sadie Seasongoods)
Wish I could deliver a big ol’ batch of these babies to you:)
They look so yummy and flaky
I definitely love homemade better than store bought! I hope you give them a try…
Your biscuits look delicious! I love the idea of having the mix made up ahead of time. I’ll definitely be following your series. Thanks for sharing with us at Creative Spark.
Glenna @ My Paper Craze
Mmmm, homemade biscuits are the greatest. And your recipe sounds great.
Thank you!
These look amazing..I could eat a whole batch of them by myself, I have a weakness for bread! What a great tip about the floured towel and the little indention…I had no idea! Thank you for sharing!
Oh my goodness! Those look so good, my mouth is watering!
There is nothing like a great pan of homemade biscuits! Thanks so much for sharing your awesome recipe with Full Plate Thursday this week. Have a great weekend and come back real soon!
Miz Helen
Yum! I love fluffy biscuts! Now I have to go check out that baking mix recipe!
Thanks for sharing this with us in the Bloggers Brags Pinterest Party! I’m pinning this to our group board.
I’ve pinned all your posts to our pinterest board. Thanks for linking up at Creative K Kids Tasty Tuesday!
Those look so crumbly and buttery, yum! Thanks for linking up to Sweet and Savoury Sunday, stop by and link up again. Have a great day!!